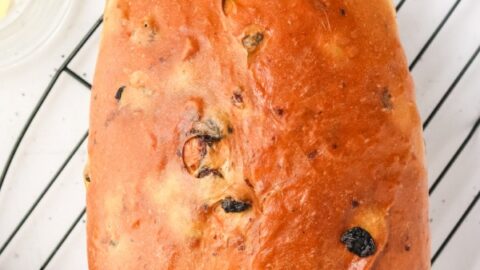
Bake the best homemade cinnamon raisin bread with this easy recipe! Soft, fluffy, and packed with sweet cinnamon and juicy raisins. Perfect for breakfast or a snack!

Nothing smells better than fresh cinnamon bread in the oven. This easy cinnamon raisin bread recipe is a soft and pillowy loaf stuffed full of plump, sweet raisins and the irresistible scent of cinnamon. This recipe is nostalgic and comforting and perfect for a rainy day or a Sunday brunch.
Homemade Cinnamon Raisin Bread Recipe | Best + Easy
If you are looking for a comforting and delicious treat, this homemade cinnamon raisin bread recipe is both the best and easiest way to satisfy your cravings. The combination of warm cinnamon and sweet raisins creates a delightful aroma that fills your kitchen, making it a perfect addition to any breakfast or snack time.
This homemade cinnamon raisin bread recipe not only offers an easy baking experience but also provides you with a comforting treat that can be enjoyed fresh out of the oven or toasted later. For an extra touch, enjoy this delightful toasted or fresh creation with butter, cinnamon sugar, jam, or cream cheese spread!

Tips and variations for making this cinnamon raisin bread recipe:
● 2¼ teaspoons is 1 packet, .25oz dry yeast
● In the United States, ½ cup butter = 1 stick.
● Butter in Baking: Essential Tips for Perfect Baked Goods
● What is scalding milk? This is simply the process of heating milk to just slightly below the boiling point (around 180 degrees Fahrenheit) before cooling it down.
● Why scald the milk first? Milk has proteins in it that can break down gluten. Scalding the milk makes those proteins go dormant, and you’ll have a much better rise if you do this.
● Is the milk scalding necessary? No, but it really helps in making this bread rise. And you have to melt the butter anyway, so why not do both? The warm milk can really bring out the flavor of cinnamon, too.
● If you want really plump raisins, soak them in a mixture of one cup of water with one teaspoon of sugar. Soak for about an hour, then drain and dry for another hour. Those raisins will really be huge. This step isn’t necessary, but it is fun to try if you have the time.
● You can use dark or golden raisins. If you are a big fan of raisins, you can use a rounded cup of raisins in this recipe.
● This is not a bread machine recipe.
● For best results, store leftovers in an airtight container, tightly wrapped with plastic wrap, or Ziploc bag at room temperature for up to 4 days.
● You can freeze this loaf in a freezer bag for up to 3 months. Thaw on the counter when you are ready to enjoy.
● If you have leftovers, use them in a bread pudding!

Other homemade bread recipes you might enjoy:
● Pull-Apart Apple Butter Bread Recipe
● Faux Sourdough Bread Recipe
● Homemade White Bread Recipe
● Pumpkin Bread Braid Recipe | Best and Easy
● Strawberry Star Bread Recipe
● Bunny Cinnamon Rolls

Homemade Cinnamon Raisin Bread Recipe Ingredients:
● ¾ cups Milk
● 6 Tablespoons unsalted Butter, divided
● ¼ cup plus 1 teaspoon Granulated White Sugar, divided
● 1 teaspoon Salt
● 2 teaspoons Ground Cinnamon
● ¼ cup Warm Water (105-115°F)
● 2¼ teaspoons Active Dry Yeast (not instant yeast)
● 1 Large Egg
● 3½ cups All-purpose Flour or Bread Flour, divided
● 1 cup Raisins
Homemade Cinnamon Raisin Bread Mise en Place:
● 9″x5″ Bread Pan (Loaf Pan)
● Thermometer
● Parchment Paper
● Non-stick Cooking Spray
● Small Saucepan
● Measuring Cup
● Measuring Spoons
● Stand-up Mixer (paddle attachment, whisk attachment, large bowl, etc.) or Hand Mixer (electric mixer)
● Rubber Spatula
● Large Bowl
● Small Bowl
● Clean Tea Towel
● Small Mixing Bowl
● Wire Baking Rack (Cooking Rack, Baking Rack, Wire Rack)

Homemade Cinnamon Raisin Bread Recipe | Best + Easy Directions:
1. Spray a 9″x5″ bread pan with cooking spray. Line the pan with parchment paper then spray the paper with cooking spray. Set aside.

2. Pour the milk into a small saucepan. Heat the milk on medium heat to scalding (not boiling). You want to see tiny bubbles around the edge of the pot, but you do not want it bubbling anywhere else. Stir often.

3. Remove from heat and add four (4) tablespoons of butter, ¼ cups of sugar, salt, and cinnamon. Stir to melt the butter and dissolve the sugar and salt. Pour the mixture into the bowl of your stand mixer and allow it to cool. Set aside for now.

4. In a small mixing bowl, sprinkle the active dry yeast over the warm water. Let the bowl stand for 5 minutes to allow the yeast to bloom.

5. Once the yeast has bloomed, add the yeast mixture to the bowl of your stand mixer (with the cooled milk mixture).

6. In the bowl of a stand mixer, add the egg and approximately half of the flour. Use the whisk attachment and beat the mixture on medium speed until everything is mixed through.

7. Add the raisins and stir them in until they are evenly mixed through the dough.

8. Turn the mixer on medium-low speed and slowly add the remaining half of the flour, a few tablespoons at a time, until the dough comes together and the sides of the bowl are clean.

9. Spray a large mixing bowl with non-stick cooking spray (or vegetable oil).
10. Place the dough in the bowl and turn to coat all sides of the dough.

11. Cover with a clean towel and place in a warm, dry spot for 60 minutes to rise. When done, the dough will be puffy and double in size. This is the first rise.

12. Turn the dough onto a lightly floured surface and shape it into a loaf. Tuck any seams underneath.

13. Place in your prepared bread pan. Cover with a towel and put in a dry, warm place to rise for 30 minutes. The loaf will fill the pan and rise over the top of the pan. This is the second rise.
14. Preheat the oven to 350 degrees Fahrenheit.

15. Bake in a preheated 350°F oven for 35 minutes. The top of the loaf will be a deep golden brown color.

16. Remove from the oven and immediately brush the top of the bread with the melted butter.

17. Cool in the pan for 15 minutes before moving to a cooling rack to cool until warm or room temperature before digging in.

18. Store leftovers in an airtight container or Ziploc bag at room temperature for up to four (4) days.


19. You can freeze this loaf in a freezer bag for up to three (3) months. Thaw on the counter when you are ready to enjoy.
Homemade Cinnamon Raisin Bread Recipe | Best + Easy
Homemade Cinnamon Raisin Bread Recipe | Best + Easy. Bake the best homemade cinnamon raisin bread with this easy recipe! Soft, fluffy, and packed with sweet cinnamon and juicy raisins. Perfect for breakfast or a snack!
Ingredients
- ¾ cups Milk
- 6 Tablespoons unsalted Butter, divided
- ¼ cup plus 1 teaspoon Granulated White Sugar, divided
- 1 teaspoon Salt
- 2 teaspoons Ground Cinnamon
- ¼ cup Warm Water (105-115°F)
- 2¼ teaspoons Active Dry Yeast (not instant yeast)
- 1 Large Egg
- 3½ cups All-purpose Flour or Bread Flour, divided
- 1 cup Raisins
Instructions
- Spray a 9"x5" bread pan with cooking spray. Line the pan with parchment paper then spray the paper with cooking spray. Set aside.
- Pour the milk into a small saucepan. Heat the milk on medium heat to scalding (not boiling). You want to see tiny bubbles around the edge of the pot, but you do not want it bubbling anywhere else. Stir often.
- Remove from heat and add four (4) tablespoons of butter, ¼ cups of sugar, salt, and cinnamon. Stir to melt the butter and dissolve the sugar and salt. Pour the mixture into the bowl of your stand mixer and allow it to cool. Set aside for now.
- Sprinkle the active dry yeast in a small mixing bowl over the warm water. Let the bowl stand for 5 minutes to allow the yeast to bloom.
- Once the yeast has bloomed, add the yeast mixture to the bowl of your stand mixer (with the cooled milk mixture).
- In the bowl of a stand mixer, add the egg and approximately half of the flour. Use the whisk attachment to beat the mixture on medium speed until everything is mixed through.
- Add the raisins and stir them in until they are evenly mixed through the dough.
- Turn the mixer on medium-low speed and slowly add the remaining half of the flour, a few tablespoons at a time, until the dough comes together and the sides of the bowl are clean.
- Spray a large mixing bowl with non-stick cooking spray (or vegetable oil).
- Place the dough in the bowl and turn to coat all sides of the dough.
- Cover with a clean towel and place in a warm, dry spot for 60 minutes to rise. When done, the dough will be puffy and double in size. This is the first rise.
- Turn the dough onto a lightly floured surface and shape it into a loaf. Tuck any seams underneath.
- Place in your prepared bread pan. Cover with a towel and put in a dry, warm place to rise for 30 minutes. The loaf will fill the pan and rise over the top of the pan. This is the second rise.
- Preheat the oven to 350 degrees Fahrenheit.
- Bake in a preheated 350°F oven for 35 minutes. The top of the loaf will be a deep golden brown color.
- Remove from the oven, melt the remaining two tablespoons of butter, and immediately brush the top of the bread with the melted butter.
- Cool in the pan for 15 minutes before moving to a cooling rack to cool until warm or room temperature before digging in.
- Store leftovers in an airtight container or Ziploc bag at room temperature for up to four (4) days.
- You can freeze this loaf in a freezer bag for up to three (3) months. Thaw on the counter when you are ready to enjoy.
Recommended Products
As an Amazon Associate and member of other affiliate programs, I earn from qualifying purchases.
-
 Monfish Loaf Bread Pan open top Rectangle loaf pan for baking bread carbon steel non stick loaf cake pan 9.5x5.75 inch
 -
 Tongjude 4 Piece Silicone Loaf Pan for Baking Bread, Non-Stick Kitchen Oven Bread Pan, Perfect for Banana Bread, Sandwich Bread, Pound Cake and Meatloaf, 4 Cups, Grey
 -
 Emile Henry Made In France Bread Loaf Baker, 9.4 x 5"", Charcoal
Nutrition Information:
Yield:
16Serving Size:
1Amount Per Serving: Calories: 211Total Fat: 5gSaturated Fat: 3gTrans Fat: 0gUnsaturated Fat: 2gCholesterol: 24mgSodium: 145mgCarbohydrates: 36gFiber: 2gSugar: 7gProtein: 5g
Note: for exact nutritional information, consult your dietitian. All nutritional information provided is simply a guideline.

● For more recipes on Ann’s Entitled Life, click here.
● If you enjoyed this post, be sure to sign up for the Ann’s Entitled Life weekly newsletter, and never miss another article!
Leave a Reply