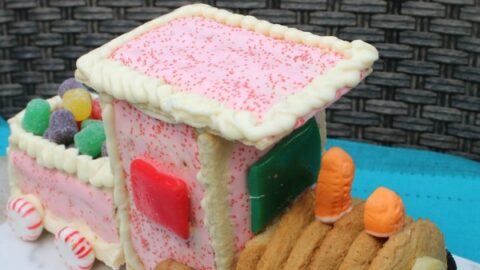
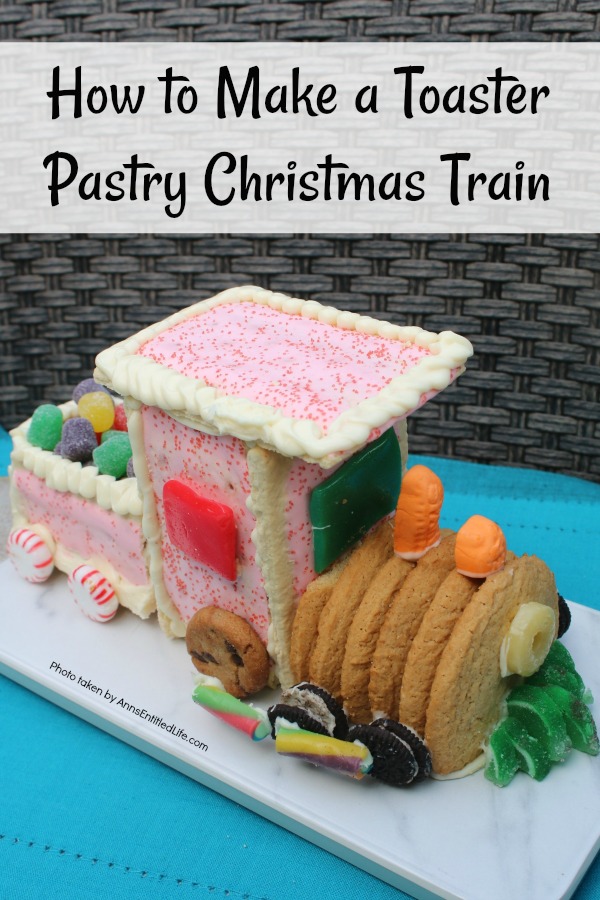
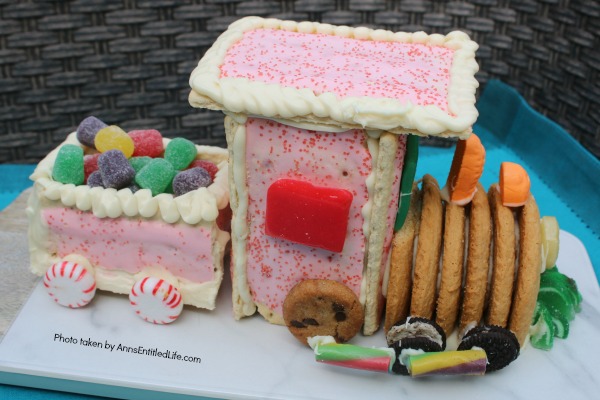
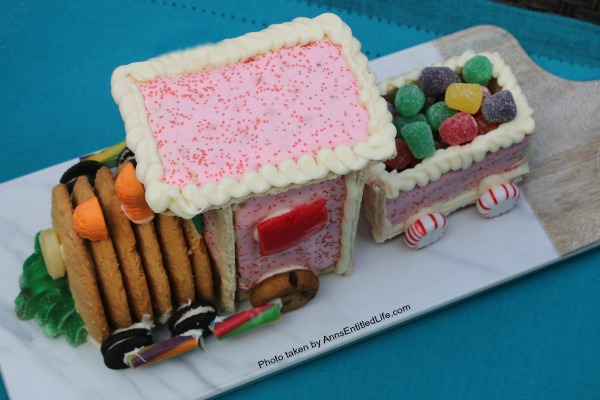
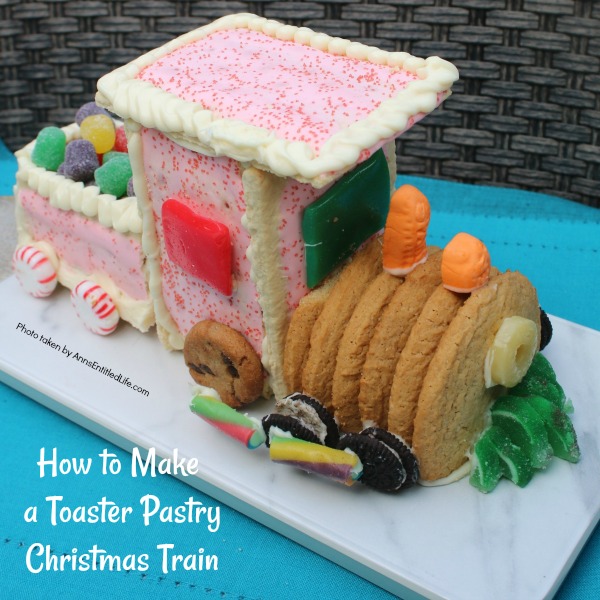
This eatable Christmas Train made with toaster pastries is a fun alternative to a gingerbread house. Use it as your table decor, and then eat it for dessert. Follow these step-by-step tutorial instructions to learn how to assemble this adorable Christmas train.
How to Make a Toaster Pastry Christmas Train
If you are looking for cute no-bake holiday treats, check these out:
● Reindeer Grahams Cookie Recipe
● Snowman Cookie Balls Recipe
● Sugar Cookie Truffles Recipe
Tips and variations for making this toaster pastry Christmas train:
● If you are not sure how fast the candy melts in your local grocery store turnover, buy some Wilton chocolates. They are a great consistency and generally easier to work with.
● If your chocolate melts are not smoothing out as you would like, add a touch of vegetable oil and heat again (this would be the third round).
● Load your piping bag into a glass, pointy side down. Fold the edges over the glass. Now fill with your melted white chocolate via a spoon. Snip the bottom (if using disposable), and you can use your candy piping bag to “candy glue” as well as to decorate. Remember, you cannot reheat candy in a piping bag, so work with small amounts!
● We filled the coal car with gumdrops. You could fill it with any type of candy you like including chocolates (black coal), raspberry gummies, or wrapped round-candy.
● You do not have to use the candies “we” (that is the royal we since my niece did 99% of this train… I was spare hands) did. The biggest thing to remember when making this train is scale… do not let your candies get too large.
● This was edged at the top with piping. You could also edge the “windows” to match.
● If using edible glue or sprinkles, make sure to use a light hand and sprinkle on top of the edging while the candy is wet.
● Whatever you do allow the chocolate to dry before moving on to the next section.
● To save time, do a section, candy-glue, and then do the next part while the candy-glue is drying.
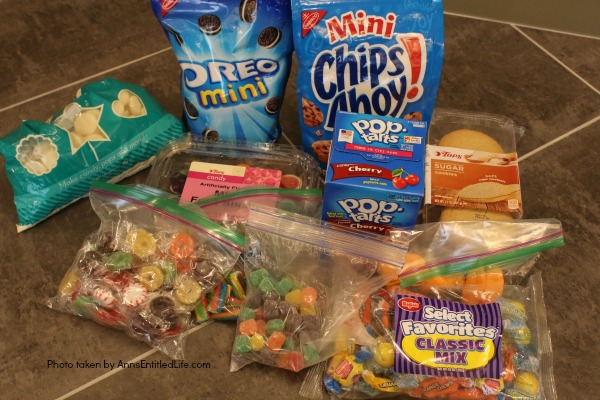
Toaster Pastry Christmas Train Ingredients:
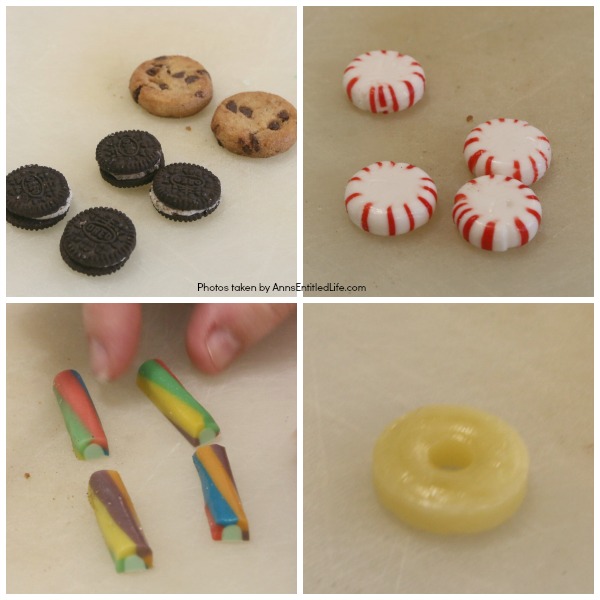
● 6 Toaster Pastry
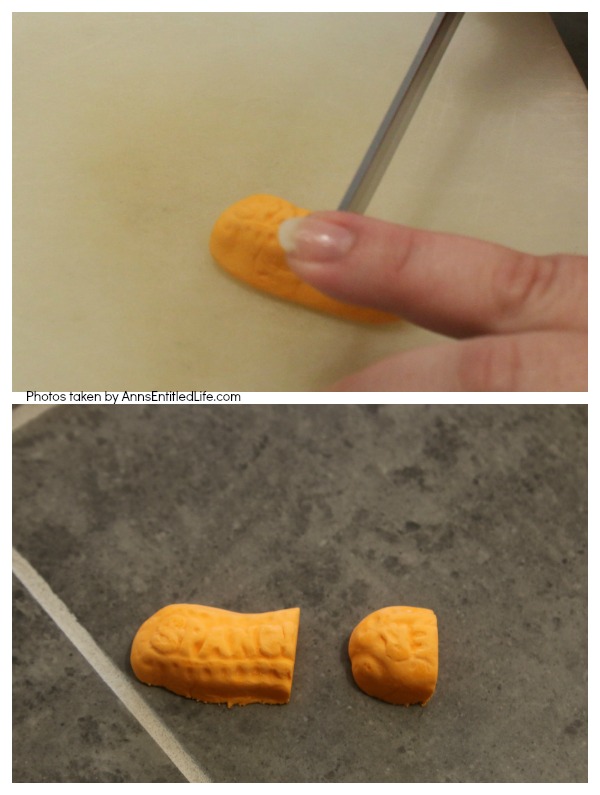
● 1 Peanut (for the smoke stand)
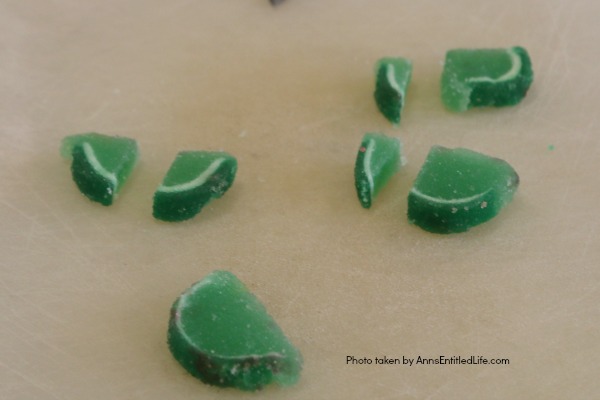
● 4 Mini Fruit Slices (for the cow pusher in the front of the train)
● 6 Small Cookies (for wheels)
● 6 plain Sugar Cookies (locomotive body)
● 2 Licorice (for wheel brace)
● 1 Lifesaver (headlight)
● 1 Airhead (windows, or use 2 mini airheads to mix and match colors – which was what this tutorial shows)
● 4 Starlights (coal car wheels)
● Gumdrops (coal)
Toaster Pastry Christmas Train Mise en Place:
● Piping Bag
● Bowl
● Spoon
● Knife
● Cutting Board
● Wax Paper
● 2 Glasses
● White Chocolate Melts
Toaster Pastry Christmas Train Directions:
● Make all your cuts first if possible.
● Cut peanut into a 1/3-2/3 section.
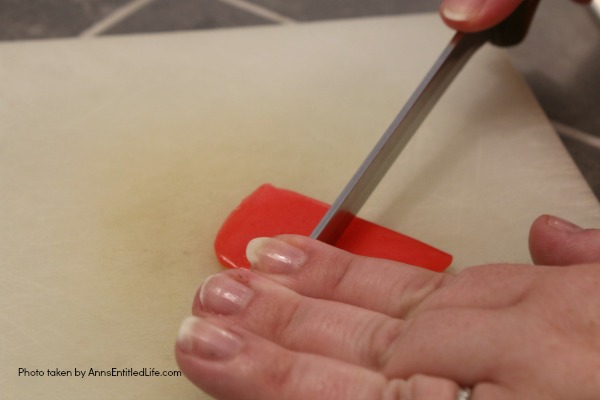
● Cut one mini airhead in half. If using a large airhead, cut 2 small windows (for the side of the train cab), and 1 large window (for the cab front window).
● Cut mini fruit slices for the cow pusher.
● 1 – leave the whole half.
● 1 – cut in half.,
● 2 – cut ¾, ¼.
● This is going to be assembled as: ¼, ½, ¾, full, ¾, ½, ¼.
● Toaster pastry – leave 3 whole for the front, back, and roof.
● Cuts:
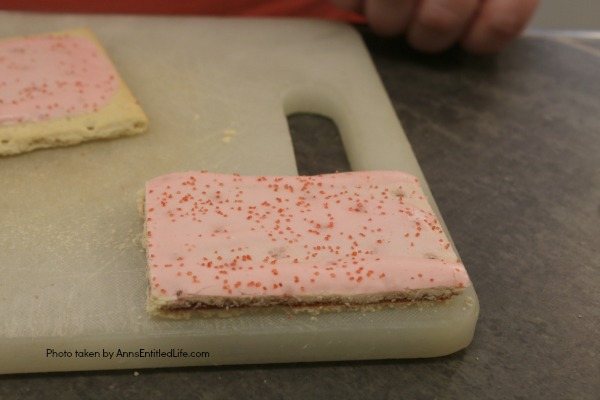
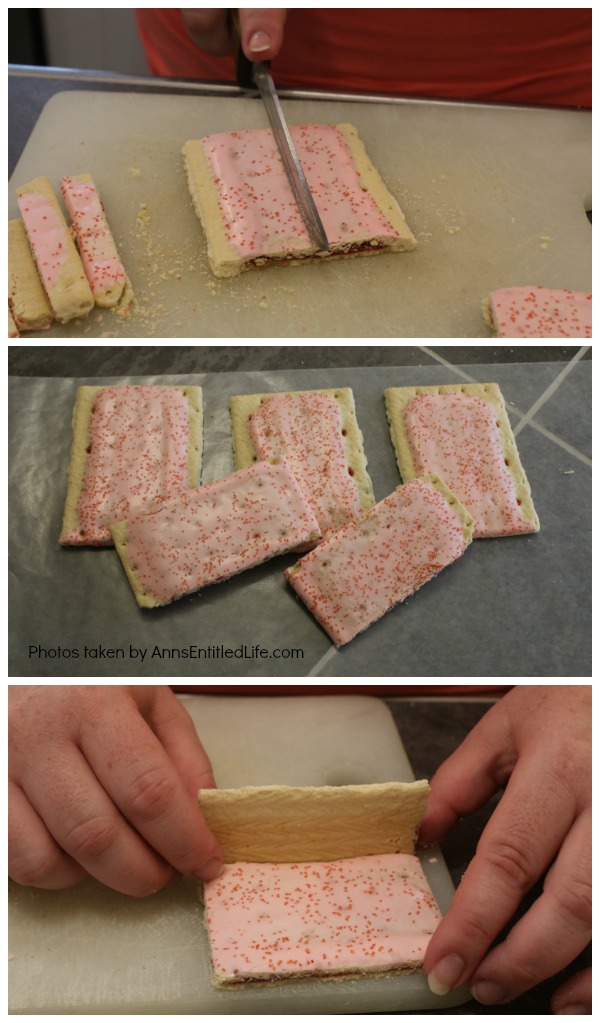
● #1 Trim one toaster pastry along the edges so you can see the filling inside.
● #2 Trim short end of a second toaster pastry. Cut in half lengthwise. These are the tall walls of the cab.
● #3 Trim long edges off a third toaster pastry. Match up the height of the “wall” from the first toaster pastry cut, turn the piece around, and cut again. You want 2 long-ish pieces + 2 matching short pieces to form the coal car.
● You will be candy-gluing the cut edges, and they will not be visible.
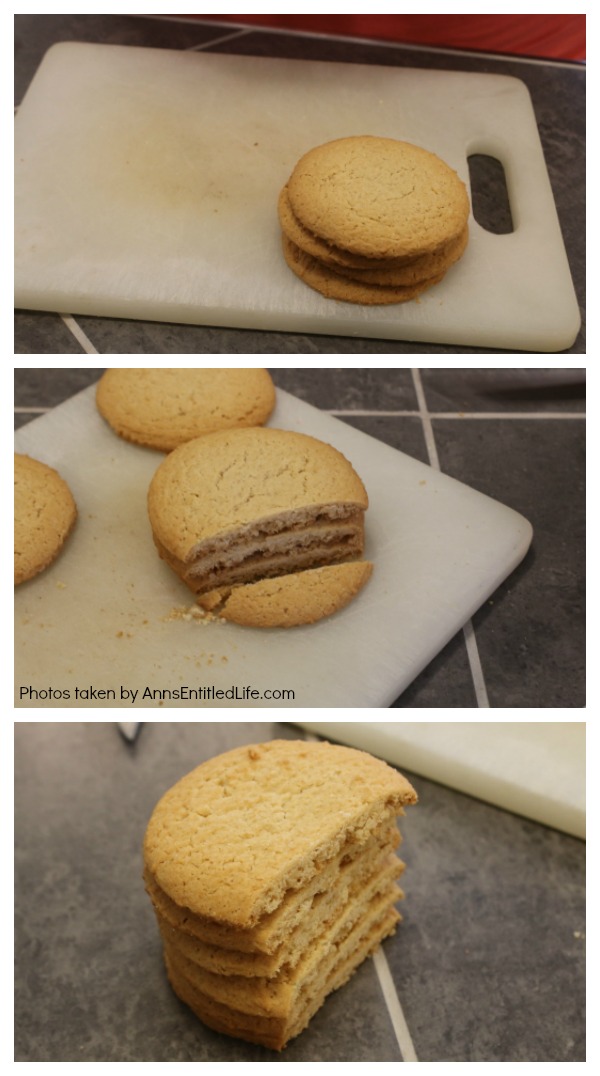
● Cut a small amount of cookie off of one plain sugar cookie to form a flat bottom.
● Place a second cookie on top of that cut cookie and cut off the same amount. Repeat for all remaining sugar cookies. By doing this, your sugar cookies will end up the same size.
● Layout wax paper on your work surface.
● Place a cup of white chocolate melts into a bowl. Heat in the microwave for 30 seconds, stir. Heat in microwave for another 30 seconds; stir. Repeat a third time. Check the consistency of your chocolate. If smooth, do not heat further. If it still does not stir and drip smoothly heat one more time.
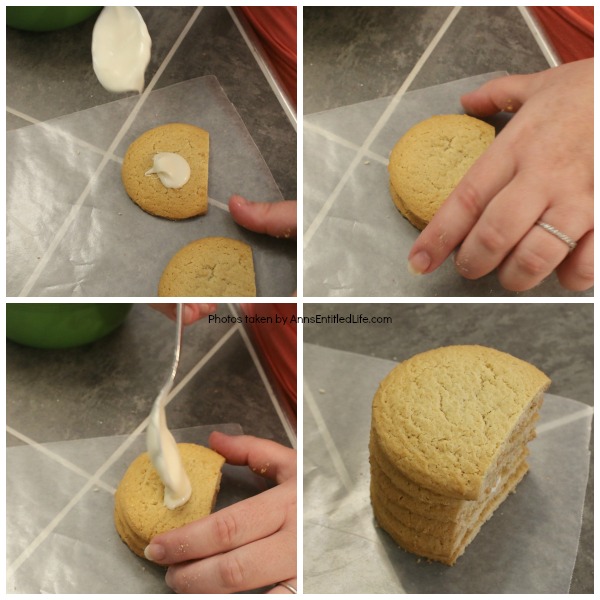
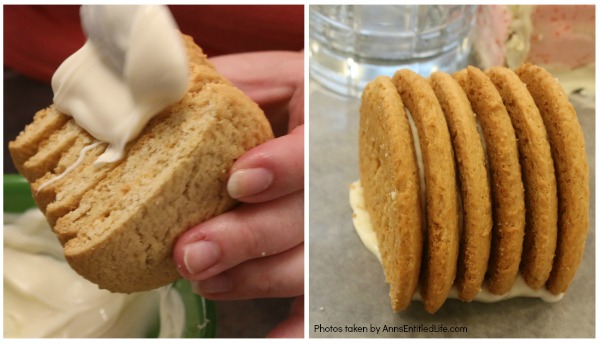
● Drop a dollop of melted white chocolate between each cut sugar cookie to “glue” them together. No candy on either end.
● Allow the chocolate to dry.
● Place melted white chocolate into a pastry bag.
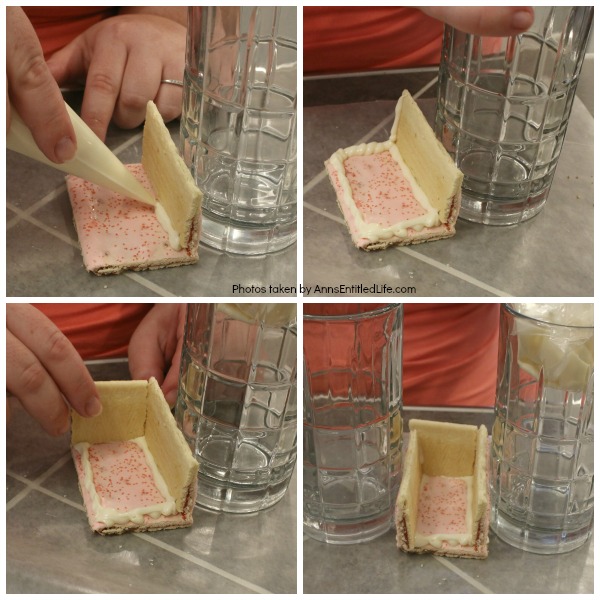
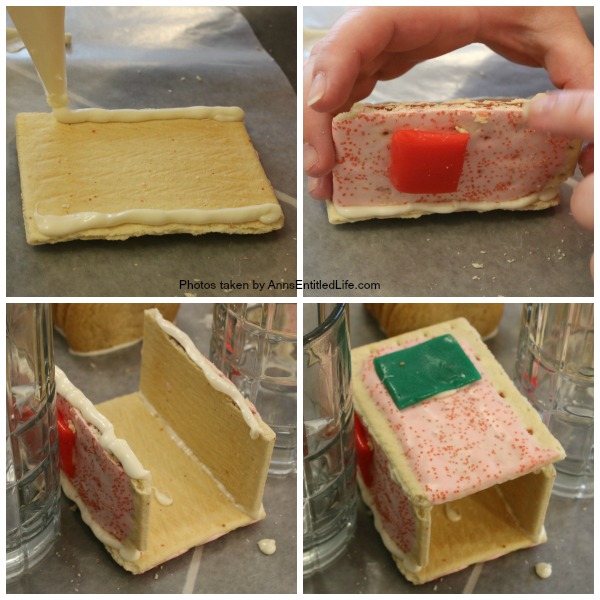
● Place down the toaster pastry that was trimmed on all four sides, unfrosted side down.
● Place a line of chocolate down along the edge of the pastry.
● Place one pastry for the long wall cut side down on top of the wet melted white chocolate. Use a glass to help prop it up until it had time to set.
● Place the small toaster pastry cut side down on top of the wet melted white chocolate along the back. Use a glass to help prop it up until it had time to set.
● Place one pastry for the other long wall cut side down on top of the wet melted white chocolate. Use a glass to help prop it up until it had time to set.
● Place some chocolate glue along with the last small piece of toaster pastry and insert in the open space. You may be able to set it in like the rest of them or have to do it this way.
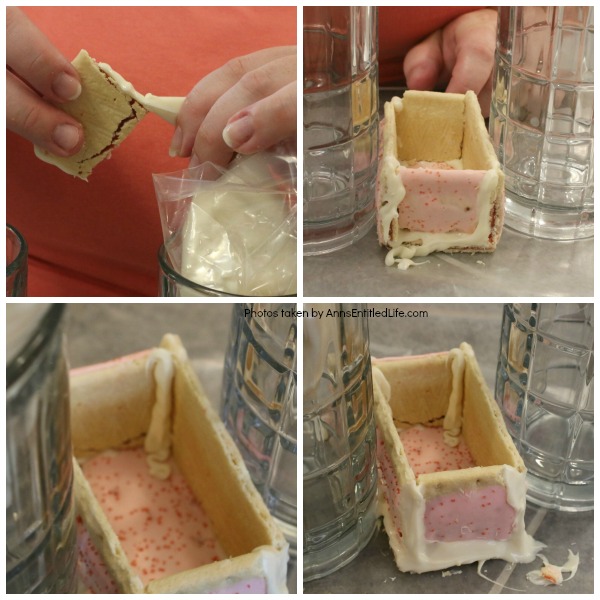
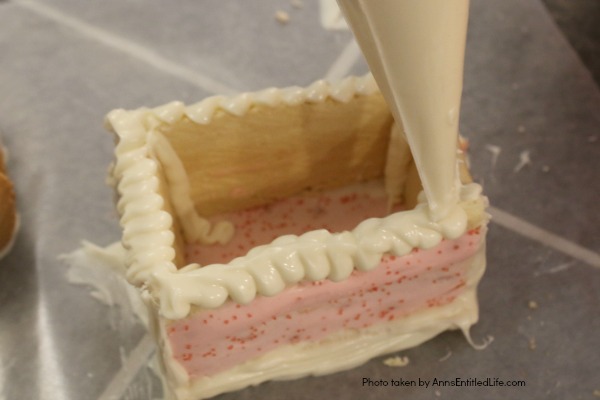
● Pipe some melted white chocolate into the inside corners.
● Allow the chocolate to dry.
● Place a line of melted candy on all outside edges. You want to be sure everything is sealed.
● Allow the chocolate to dry.
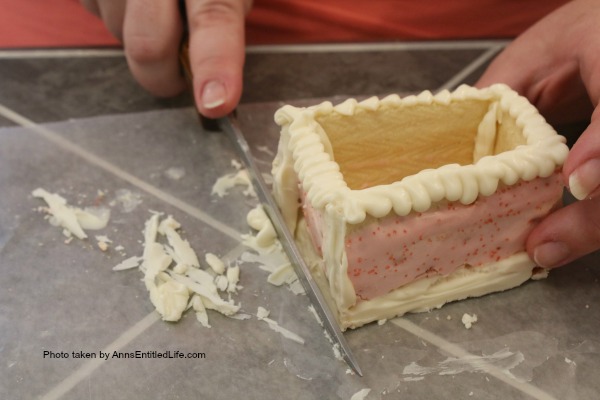
● Note: Do not worry about chocolate drips or splatters much, you can trim the edges up later (and will).
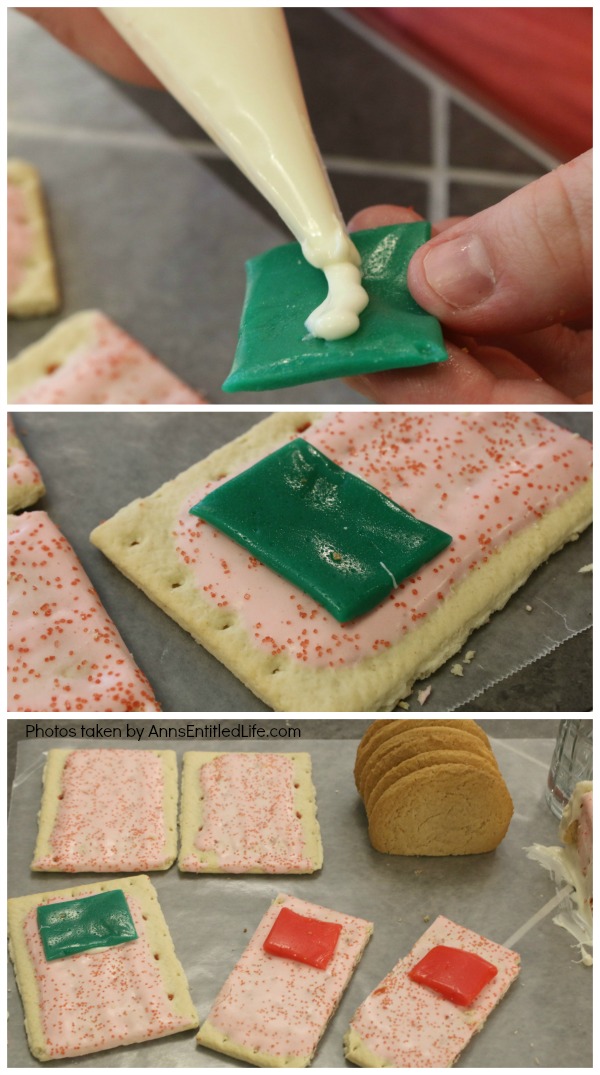
● Using melted chocolate, attach the front window to an uncut toaster pastry’s frosting side.
● Lay down the two cut sidewalls of the engine cab frosting side up. Dab some melted chocolate on the windows, attach it to the sidewall. You may want to make sure these are fairly even for the 3 pieces – or at least not hugely different in height when they are glued together.
● Allow the chocolate to dry.
● Pick up the dry locomotive body and slather melted white chocolate on the bottom flat part.
● Place on wax paper and allow to dry.
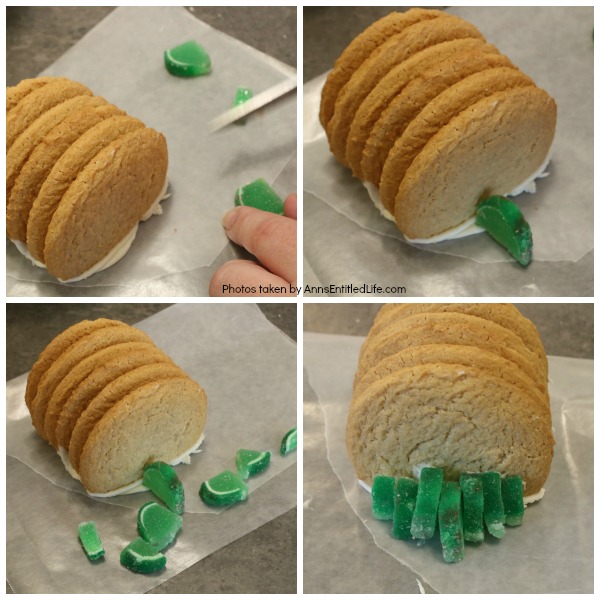
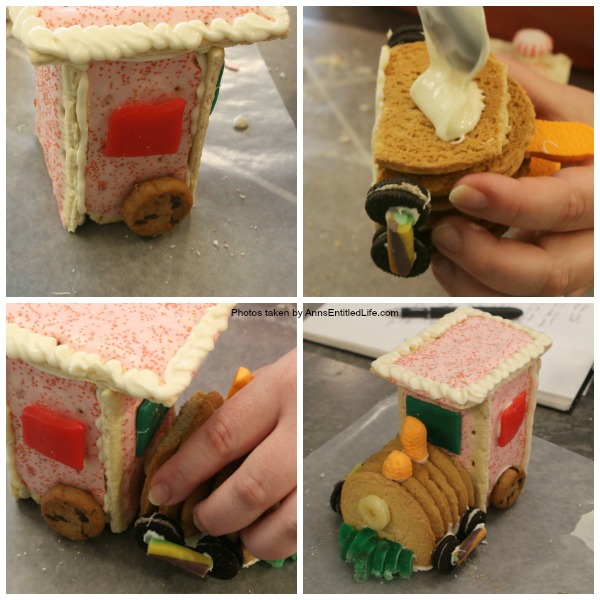
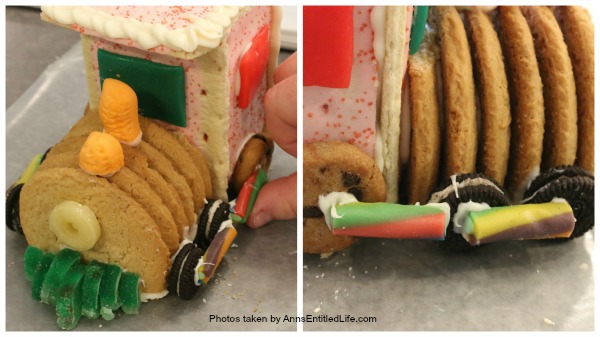
● Attach the cow pusher using the mini fruits as so: ¼, ½, ¾, full, ¾, ½, ¼.
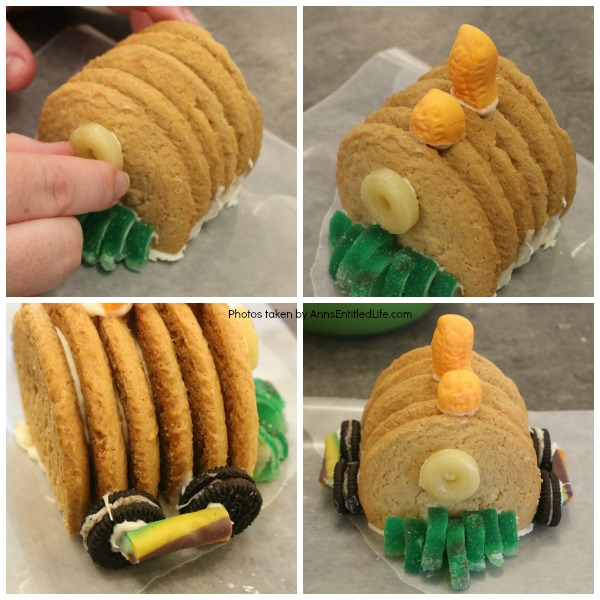
● Attach lifesaver light with a dab of melted chocolate.
● Attach peanut smokestack with the smaller piece in front of the larger piece (also with melted chocolate for glue).
● Attach 2 small cookies on each side of the locomotive body.
● Attach 1 licorice brace to “connect” the 2 small cookies.
● Allow the chocolate to dry.
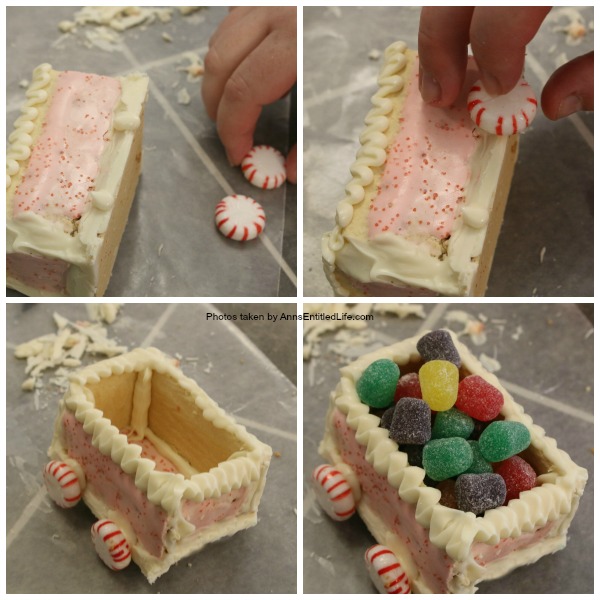
● Edge the top of the coal car with melted white chocolate.
● When completely dry, lift off the wax paper and trim the bottom edges.
● Assemble the cab:
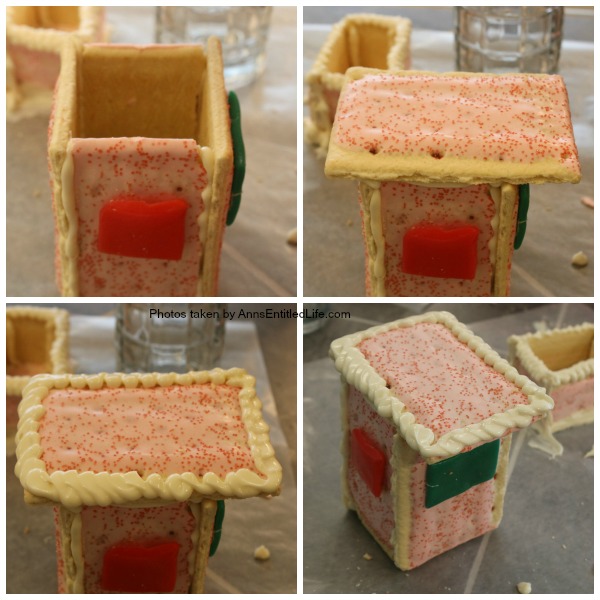
● Lay an uncut toaster pastry side down.
● Edge the long sides with melted white chocolate.
● Place one long cut toaster pastry down on the melted white chocolate with a window facing out.
● Repeat on the opposite side. Use glasses to hold sides in place.
● Allow the chocolate to dry.
● Place a line of melted white chocolate on each of the long sides, and place the front of the cab (window side out) on top of that.
● Allow the chocolate to dry.
● Stand the cab up (windows should be high).
● Line the top of the cab with melted chocolate.
● Place an uncut toaster pastry on top of that melted chocolate.
● Allow the chocolate to dry.
● Place a line of melted candy on all outside edges. You want to be sure everything is sealed.
● Edge the top to match the coal car.
● Allow the chocolate to dry.
● Place the coal car on its side, and dab two spots of melted white chocolate.
● Attach starlight candies for wheels.
● Allow the chocolate to dry.
● Repeat on the other side.
● Load with “coal”.
● Attach two small wheels to the cab.
● Dab melted chocolate onto the back of the locomotive body. Attach to the cab.
● Allow the chocolate to dry.
● Place a brace from the front wheels to the back wheels on the locomotive using melted white chocolate.
● Allow the chocolate to dry.
● Display!
● There are a ton of steps to this tutorial, but it is not at all difficult to make. The biggest concern is making sure you have melted chocolate, and that you allow all parts to dry.
● This is SO cute in person! It went off to my nephew-by-marriage’s work and was a big hit.
How to Make a Toaster Pastry Christmas Train
How to Make a Toaster Pastry Christmas Train. This eatable Christmas Train made with toaster pastries is a fun alternative to a gingerbread house. Use it as your table decor, and then eat it for dessert. Follow these step-by-step tutorial instructions to learn how to assemble this adorable Christmas train.
Ingredients
- 6 Toaster Pastry
- 1 Peanut (for the smoke stand)
- 4 Mini Fruit Slices (for the cow pusher in the front of the train)
- 6 Small Cookies (for wheels)
- 6 plain Sugar Cookies (locomotive body)
- 2 Licorice (for wheel brace)
- 1 Lifesaver (headlight)
- 1 Airhead (windows, or use 2 mini airheads to mix and match colors – which was what this tutorial shows)
- 4 Starlights (coal car wheels)
- Gumdrops (coal)
Instructions
- Make all your cuts first, if possible.
- Cut peanut into a 1/3-2/3 section.
- Cut one mini airhead in half. If using a large airhead, cut 2 small windows (for the side of the train cab) and 1 large window (for the cab front window).
- Cut mini fruit slices for the cow pusher.
- 1 – leave the whole half.
- 1 – cut in half.,
- 2 – cut ¾, ¼.
- This is going to be assembled as ¼, ½, ¾, full, ¾, ½, ¼.
- Toaster pastry – leave 3 whole for the front, back, and roof.
- Cuts:
- #1 Trim one toaster pastry along the edges so you can see the filling inside.
- #2 Trim short end of a second toaster pastry. Cut in half lengthwise. These are the tall walls of the cab.
- #3 Trim long edges off a third toaster pastry. Match up the height of the “wall” from the first toaster pastry cut, turn the piece around, and cut again. You want 2 long-ish pieces + 2 matching short pieces to form the coal car.
- You will be candy-gluing the cut edges, and they will not be visible.
- Cut a small amount of cookie off of one plain sugar cookie to form a flat bottom.
- Place a second cookie on top of that cut cookie, and cut off the same amount. Repeat for all remaining sugar cookies. By doing this, your sugar cookies will end up the same size.
- Lay out wax paper on your work surface.
- Place a cup of white chocolate melts into a bowl. Heat in the microwave for 30 seconds, stir. Heat in microwave for another 30 seconds; stir. Repeat a third time. Check the consistency of your chocolate. If smooth, do not heat further. If it still does not stir and drip smoothly heat one more time.
- Drop a dollop of melted white chocolate between each cut sugar cookie to “glue” them together. No candy on either end.
- Allow the chocolate to dry.
- Place melted white chocolate into a pastry bag.
- Place down the toaster pastry that was trimmed on all four sides, unfrosted side down.
- Place a line of chocolate down along the edge of the pastry.
- Place one pastry for the long wall cut side down on top of the wet melted white chocolate. Use a glass to help prop it up until it had time to set.
- Place the small toaster pastry cut side down on top of the wet melted white chocolate along the back. Use a glass to help prop it up until it had time to set.
- Place one pastry for the other long wall cut side down on top of the wet melted white chocolate. Use a glass to help prop it up until it had time to set.
- Place some glue along with the last small piece of toaster pastry and insert it in the open space. You may be able to set it in like the rest of them or have to do it this way.
- Pipe some melted white chocolate into the inside corners.
- Allow the chocolate to dry.
- Place a line of melted candy on all outside edges. You want to be sure everything is sealed.
- Allow the chocolate to dry. Note: Do not worry about chocolate drips or splatters much, you can trim the edges up later (and will).
- Using melted chocolate, attach the front window to an uncut toaster pastry’s frosting side.
- Lay down the two cut sidewalls of the engine cab frosting side up. Dab some melted chocolate on the windows, attach it to the sidewall. You may want to make sure these are fairly even for the 3 pieces – or at least not hugely different in height when they are glued together.
- Allow the chocolate to dry.
- Pick up the dry locomotive body and slather melted white chocolate on the bottom flat part.
- Place on wax paper and allow to dry.
- Attach the cow pusher using the mini fruits as so: ¼, ½, ¾, full, ¾, ½, ¼.
- Attach a lifesaver light with a dab of melted chocolate.
- Attach a peanut smokestack with the smaller piece in front of the larger piece (also with melted chocolate for glue).
- Attach 2 small cookies on each side of the locomotive body.
- Attach 1 licorice brace to “connect” the 2 small cookies.
- Allow the chocolate to dry.
- Edge the top of the coal car with melted white chocolate.
- When completely dry, lift off the wax paper and trim the bottom edges.
- Assemble the cab:
- Lay an uncut toaster pastry side down.
- Edge the long sides with melted white chocolate.
- Place one long cut toaster pastry down on the melted white chocolate with a window facing out.
- Repeat on the opposite side. Use glasses to hold sides in place.
- Allow the chocolate to dry.
- Place a line of melted white chocolate on each of the long sides, and place the front of the cab (window side out) on top of that.
- Allow the chocolate to dry.
- Stand the cab up (windows should be high).
- Line the top of the cab with melted chocolate.
- Place an uncut toaster pastry on top of that melted chocolate.
- Allow the chocolate to dry.
- Place a line of melted candy on all outside edges. You want to be sure everything is sealed.
- Edge the top to match the coal car.
- Allow the chocolate to dry.
- Place the coal car on its side, and dab two spots of melted white chocolate.
- Attach starlight candies for wheels.
- Allow the chocolate to dry.
- Repeat on the other side.
- Load with “coal”.
- Attach two small wheels to the cab.
- Dab melted chocolate onto the back of the locomotive body. Attach to the cab.
- Allow the chocolate to dry.
- Place a brace from the front wheels to the back wheels on the locomotive using melted white chocolate.
- Allow the chocolate to dry.
- Display!
Notes
This is easy to make, it just has a lot of steps.
Whatever you do allow the chocolate to dry before moving on to the next section.
Recommended Products
As an Amazon Associate and member of other affiliate programs, I earn from qualifying purchases.
-
 CaliTime Pack of 2 Cozy Fleece Throw Pillow Cases Covers for Couch Bed Sofa Christmas Snowflakes Both Sides 18 X 18 Inches Medium Grey
 -
 NIDITW Happy Holidays Snowflakes Falling Red Cotton Linen Throw Pillow case Cushion Cover Sofa Chair Decorative Rectangle 12x20 Inches
 -
 Batmerry Set of 2 Merry Christmas Decorative Pillow Covers 18x18 inch,Blue Snow Winter with Snowflakes Falling White Crystal Double Sided Throw Pillow Covers Sofa Cushion Cover
Nutrition Information:
Yield:
10Serving Size:
1Amount Per Serving: Calories: 399Total Fat: 11gSaturated Fat: 3gTrans Fat: 0gUnsaturated Fat: 7gCholesterol: 6mgSodium: 227mgCarbohydrates: 74gFiber: 2gSugar: 39gProtein: 3g
Note: for exact nutritional information, consult your dietitian. All nutritional information provided is simply a guideline.
● For more Recipes on Ann’s Entitled Life, click here.
● If you enjoyed this post, be sure to sign up for the Ann’s Entitled Life weekly newsletter, and never miss another article!


ShootingStarsMag says
I think my nephew would love this! How cute, and such an original idea. Thanks for the step by step guide.
-Lauren
Kim~madeinaday says
What a clever trick using pop tarts! They are the perfect Christmas Peppermint color! I love this idea! Thank you for sharing on Merry Monday! Hope to see ya next week!
Kim