Hubby and I have a long list of renovations we hope to accomplish this summer. One of the larger projects was new hardwood floors installed in the living room, family room and office. On Monday Hardwood Floor Installation Part 1 dealt with all the decisions and preparation made before one piece of hardwood flooring is installed.
On Tuesday I wrote Hardwood Floor Installation Part 2 which dealt with our living room and office hardwood floor install, the casement moldings installed in those rooms, as well as base and shoe molding. While there were some tricky cuts and installs in those rooms, they paled by comparison to room number 3: the family room!
Our installer: Keenan Kelly had quite the job ahead of him, and no one knew it! As anyone who has ever done renovation on a home knows, there are “surprises” under walls and floors that can never be fully anticipated, and since the living room and office were fairly surprise-free, you just knew something had to be lurking in the family room.
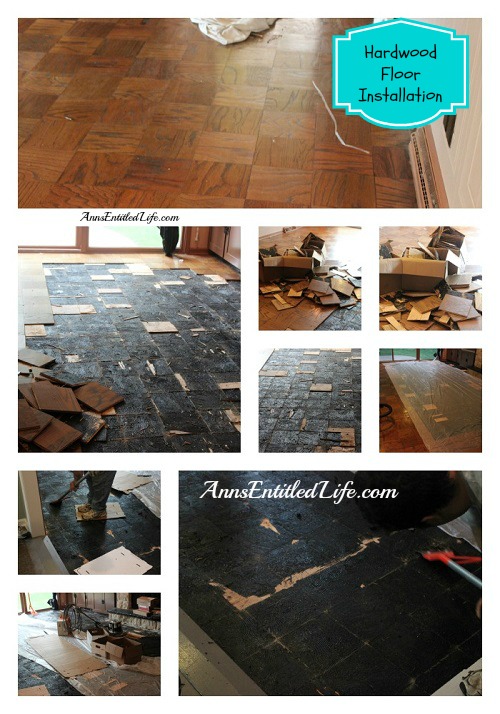
We “think” that the adhesive used to adhere the parquet floor 40 years ago may have been black mastic. We don’t know for certain. When removed, it was sticky, tar-y and a giant mess.
Realizing that Kennan had a better and higher use (not to mention he isn’t exactly 25) than popping floor tiles, my nephew came over for the day to pull up tiles. He used a combination of a plaster scraper, screwdriver and ice scraper. He got up a good 1/3- 1/2 of the floor. Since Keenan was finishing the other two rooms that day and moving to the family room the next day, getting as much up as possible was the goal.
Hubby took a turn that evening putting in an additional four hours of title popping. We covered the exposed adhesive for the night so that neither Max, nor us, would track bits of black adhesive about the house.
The next morning when Kennan came over, he and Hubby worked together to get the rest of the tiles off. Hubby popped with the ice scraper, then Kennan scraped up anything high with the plaster scraper. Hubby had rented a machine to take down the tops of the adhesive, but in the end it wasn’t needed.
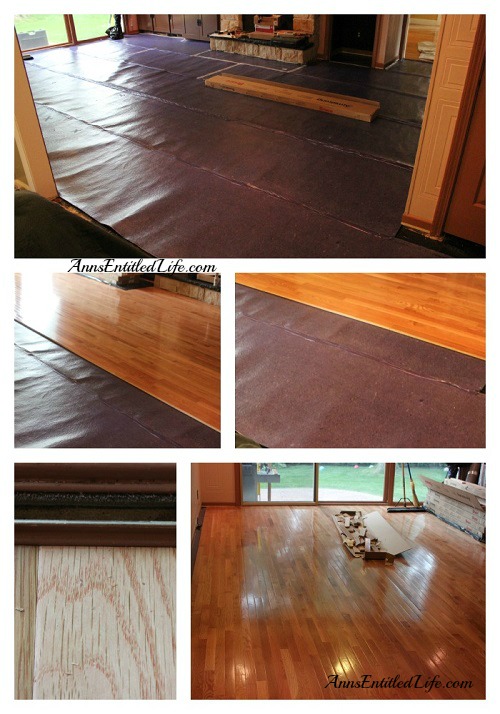
After the parquet-floor-removal nightmare, the rest of the room was fairly straightforward. We were very glad to have the “overkill” underlay of the Bellawood Premium Underlayment to smooth out any remaining dip or divot (some floor leveler was used in front of the fireplace). Kennan needed to do some scribing to fit the hardwood underneath the fireplace that you’d really have to be a good carpenter to do. Fireplace mortar was added back at the end of the floor installation underneath the base.
This room had base molding already in place, so we added shoe moldings, stained to match the floor. And, underneath the built-in cabinets, peeling vinyl needed replacing. We had our family room built-ins resurfaced in May, and knew that was necessary. Kennan took some of the hardwood flooring and ripped to use as the under cabinet molding so it would match the floor. It is a fantastic extension-illusion.
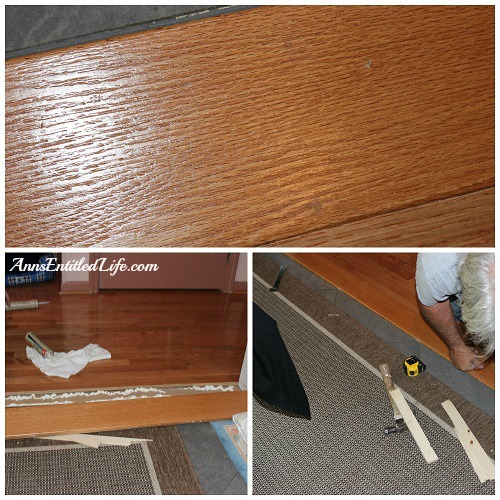
Because we started at the foyer and ended at the foyer (our first floor is a perfect flow oval), the marble thresholds that were already there remained. Kennan did some nice butting to these, as well as the sliding glass door in the family room. No filler or covering was needed in either place. The “only” threshold he had to deal with was a real doozy – the one from the kitchen to the family room. When the kitchen was redone (we didn’t do it), the floor was raised a bit with a second underlay. That meant the two floors would not run evenly. There were many choices including digging up some of the porcelain tiles that were stored down the basement that were leftovers from the kitchen floor installation, and matching the grout – the grout being the issue. The other was reworking the massive threshold that was currently in place.
Kennan thought we should let him have a go at reworking the existing threshold, so we did. It was a massive piece of oak that was painted grey. Before stripping the paint to expose the wood grain, Kennan estimated it to be an $80-$90 piece of wood. Afterward, he was positive it was that expensive. The grain is beautiful. Because the rooms aren’t perfectly square, and that included the kitchen, the threshold wasn’t an easy fix. Kennan had to do a lot of fancy fitting to make it work, but in the end it looks gorgeous!
Finishing with a bead of ceramic tile calk in pearl grey (it is grout but that is the tube name), the threshold is now installed and with it, the last piece of the floor installation puzzle.
Tomorrow Hardwood Floor Installation Part 4 will be a wrap up, before and after pictures, and what we learned from this process as well as the “was it worth it” inevitable question and answer.
See also:
● Hardwood Floor Installation Part 1
● Hardwood Floor Installation Part 2
● Hardwood Floor Installation Part 3
● Hardwood Floor Installation Part 4
● If you enjoyed this post, be sure to sign up for the Ann’s Entitled Life weekly newsletter, and never miss another article!
● For more Renovation projects on Ann’s Entitled Life, click here.


Debb F says
Looks great Ann! YUCK on the surprise adhesive issue underneath. You just never know what you are going to have to deal with until you rip it out. But it looks great! And just think, now you can use a swiffer and no hassle clean now, EASY PEASY! Just like you like! Oh and BTW, what a great summer of extreme weather to be stuck inside renovating. You picked the right year!
Ann says
Thanks Debb! Yeah I am all about swiffers… one of the greatest house-cleaners ever! When this was done it was over 90° and very humid… felt more like Savannah in the summer than Western New York. Because of how we had the house closed off, it made for a few days where the air conditioning didn’t really flow. But, for the most part, it was definitely better inside than outside.
Ann
Sara at Saving For Someday says
We jack-hammered up tile to put down our floors and it was a mess, so I don’t envy you having to deal with black mastic. Those thresholds are always the problem. We had similar issues with our tile/wood transition, but a good carpenter is definitely worth the time/money to make it look like it wasn’t an afterthought. Looking forward to the big reveal.
Ann says
Thanks Sara!
Ann
wendy d says
Ann, amazing article! I did not know it was such a complicated job. They make it seem easy-peezy on HGTV. What an amazing find your carpenter is. I think your neighborhood could keep him employed many years.
A recent news article described how there have been bidding wars on local homes because buyers are looking no-work homes. That certainly is understandable with the amount of work it has been to lay the floors even though someone else did the “work.”
Ann says
Wendy, Kennan is actually located in Buffalo, and works all over Western New York and Southern Ontario.
I looked at him a few days in and said, “What? Not done already? You mean the home shows exaggerate how fast and easy this process is!?” From my tone, he knew I was being sarcastic but he did tell me that there are people that expect installing hardwood floors in multiple rooms to be a weekend project.
Ann